

How to use Tungsten SignDoc - Step-by-Step Guide
2 min read
In today's post, we wanted to give you a step-by-step on how to create an e-signature workflow using Kofax SignDoc. For this example, ACMO will be sending John Smith a Tax File Declaration document that needs to be signed by both John Smith and ACMO.
Step 1
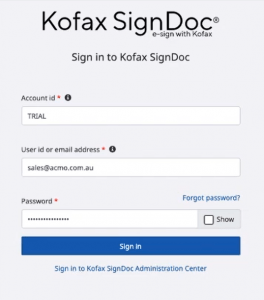
Kofax SignDoc can be integrated directly into your ERP, but for this example, we will be using the cloud-based web portal. Log in using your account ID, user name or email, and password.
Step 2
Create a new package in the Signing Packages area by clicking on "Create package" You can later save this package as a template or duplicate the package if you are sending it to multiple people.

Step 3
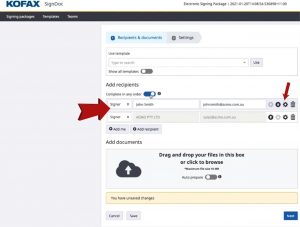
Enter your Signer/Recipients name and email details. If you would like the document to be signed in a particular order, use the slider option called "Complete in any order" and turn it off. You can then choose the order for your recipients using the up & down arrow keys next to the email address. You can also use the gear icon located next to up & down arrows to request additional information from your signer including ID card, Photo, Passport, Driver's license, or documents.
Step 4
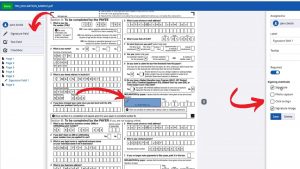
Upload the document you would like to use, and get it prepared. Click on "Prepare" to choose where you will add signature boxes to the document.
Step 5
Next, under the recipient name, choose the signature field, text field, or checkbox and drag and drop it onto the document. After dropping the signature field/text field/checkbox onto the document, you can make fine adjustments for its placing, then on the right-hand side, you will be given options to choose which signing method you would like to allow your signer to use. To add the second signer of the document, go back to the left side and choose the next signer you specified, and repeat the drag and drop signature field. Hit Save when you are done.
Step 6
Your document is now prepared, hit Next. You can now name your package, create the email subject, and email message. You can also choose an expiry date for the document, or if you would like auto-reminders sent out if the package has not been signed after a specified amount of time. Hit Finish and your packing will be on its way. You can monitor the progress of the document in your dashboard. Once the process is complete, all recipients will get a copy of the signed document, and the complete audit trail.
Read about My experience using Kofax SignDoc for the first time


